💾 Windows 10/11 Installation Guide
Follow this step-by-step guide to install Windows 10 or Windows 11 efficiently and prepare your system. 🚀
1. 📋 Pre-Installation Requirements
Microsoft Requirements
Make sure your device meets the necessary requirements.
if you're planning to use RapidOS keep in mind that you need to use specific builds:
Which version should I choose?
If your computer meets the official system requirements for Windows 11, it's a good idea to go with Windows 11 to get the latest features and updates. However, I don't recommend using version 23H2, as this update following 22H2 introduces significant driver changes that may cause compatibility issues.
-
Windows 10 Pro
Version:19045(typically22H2) -
Windows 11 Pro
Version:22621(typically22H2)
Version:22631(typically23H2)
Version:26100(typically24H2)
Any other build is not officially supported by RapidOS.
System Compatibility
We don't recommend bypassing Windows 11's requirements due to potential problems with updates and game anti-cheats. On Windows 11, a minority of anticheats (Vanguard, FACEIT, THE FINALS) require Secure Boot to be enabled.
ARM64 Users
RapidOS don't supports ARM64 processors
At this time, RapidOS does not support ARM64 processors. Full support for ARM64 will be introduced likely in version 2.0.
If you can't choose Windows to install while you're on ARM64 - the best choice is Windows 11 due to great optimizations made for this architecture, including AI-powered enhancements and improved performance tailored for ARM-based devices.
GPU Support
Earlier versions of Windows lack anticheat support (due to lack of security updates from EOL OSes), driver support (commonly GPU, NIC) and application support in general, so some users are forced to use newer builds. Refer to the table below for GPU driver compatibility:
| GPU | Minimum Windows Version |
|---|---|
| NVIDIA 10 series and lower | Supported by almost all Windows versions |
| NVIDIA 16, 20 series | Win7, Win8, Win10 1709+ |
| NVIDIA 30 series | Win7, Win10 1803+ |
| NVIDIA 40 series | Win10 1803+ |
| AMD | Refer to driver support page |
2. 🌐 Install Latest Windows
Official Method of Installation
Instructions Apply to Both Windows 10 and 11
This guide is designed for both Windows 10 and 11 Media Creation Tools. The steps are nearly identical for both versions, so there's no need for separate instructions.
The official tool from Microsoft allows you to create a bootable USB or directly upgrade your system. Follow the steps below to create a bootable USB:
-
Download the Windows 10 or Windows 11 Media Creation Tool, save Media Creation Tool to Desktop or Downloads folder. MCT must be saved and run from outside the USB flash drive. Just moving an ISO file to the USB flash drive will not make it bootable.
-
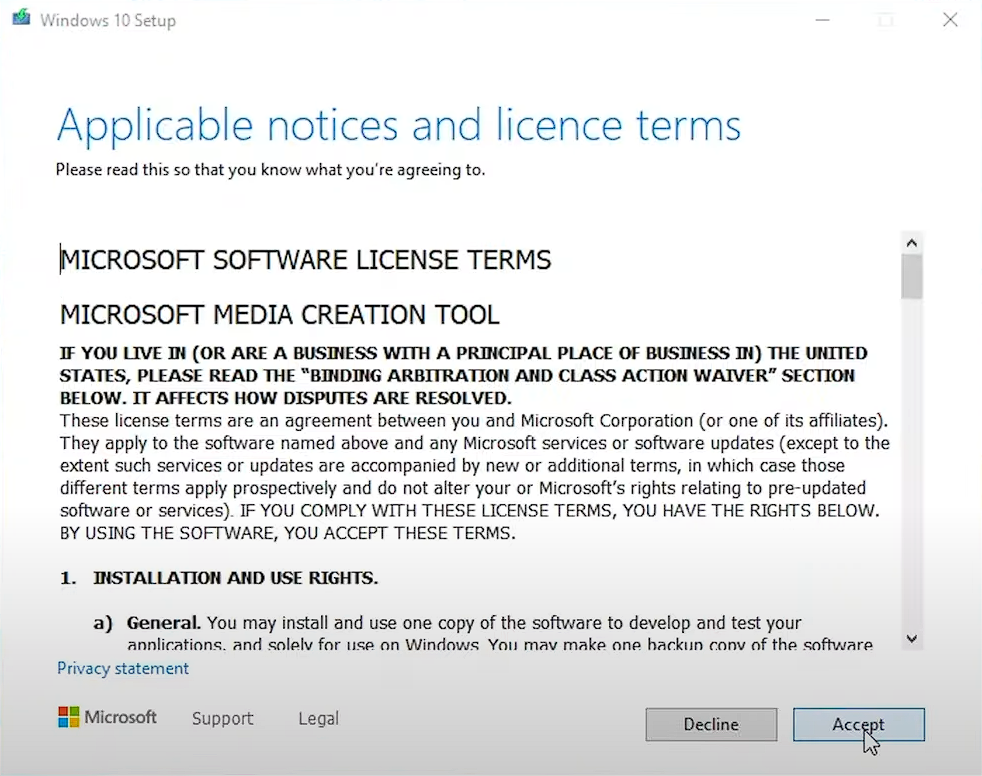
Open MCT and agree the Windows Terms of Service by clicking "Accept" to proceed.
-
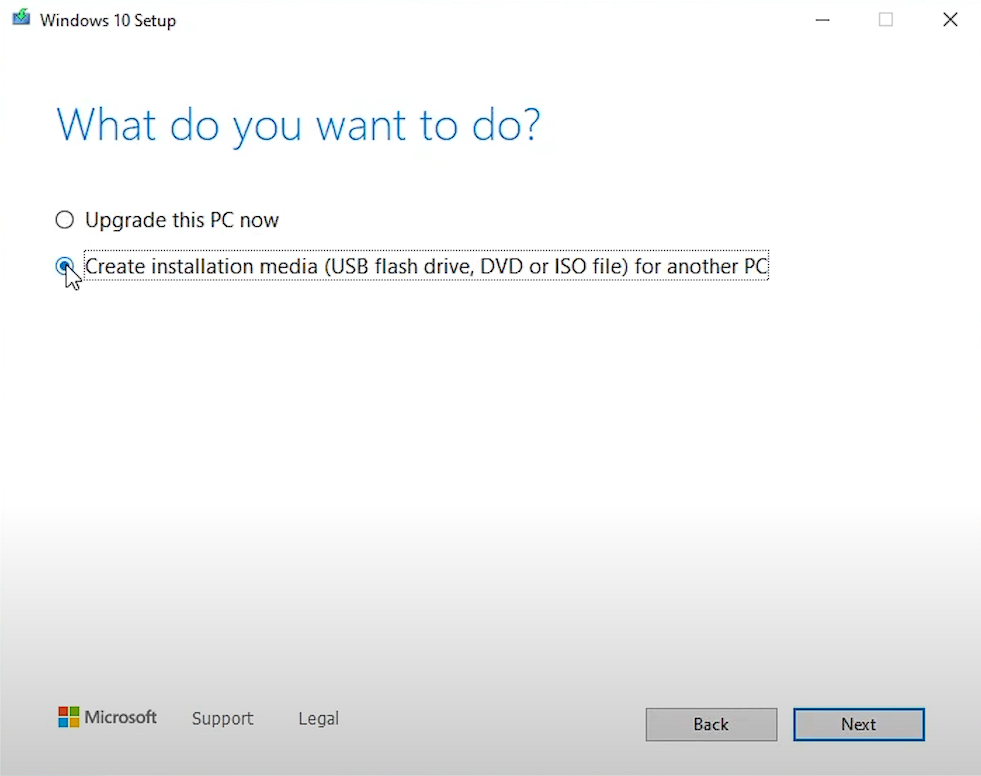
Select "Create installation media for another PC", and then click "Next".
-
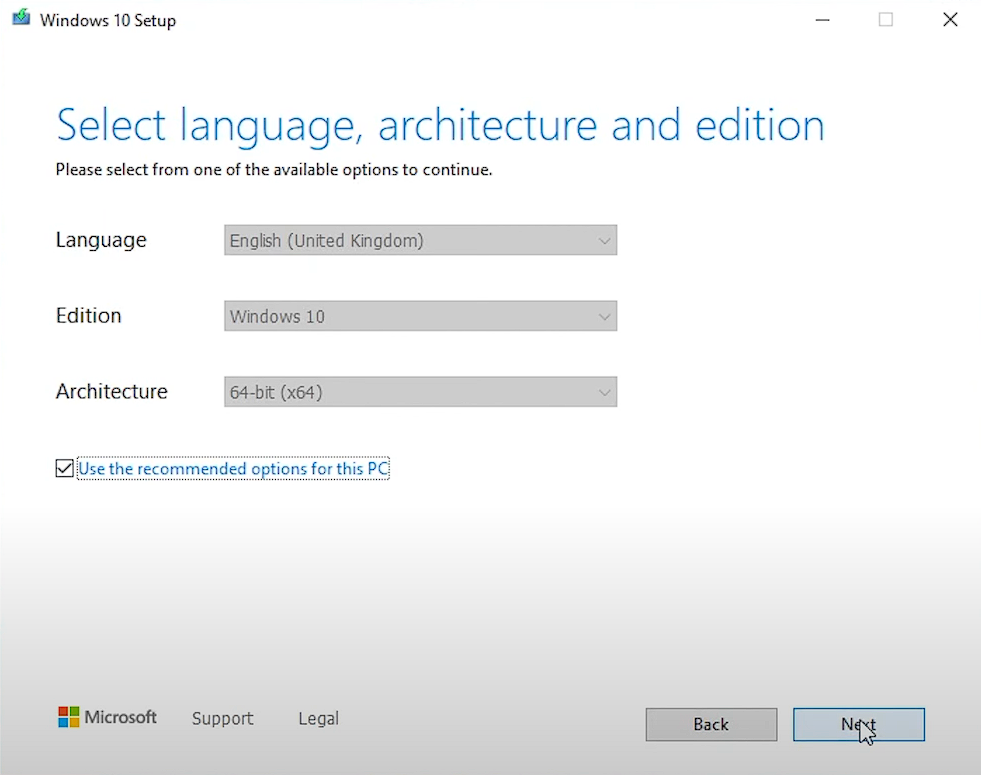
You can keep the default settings and press "Next".
-
Select "USB flash drive", then press "Next".

-
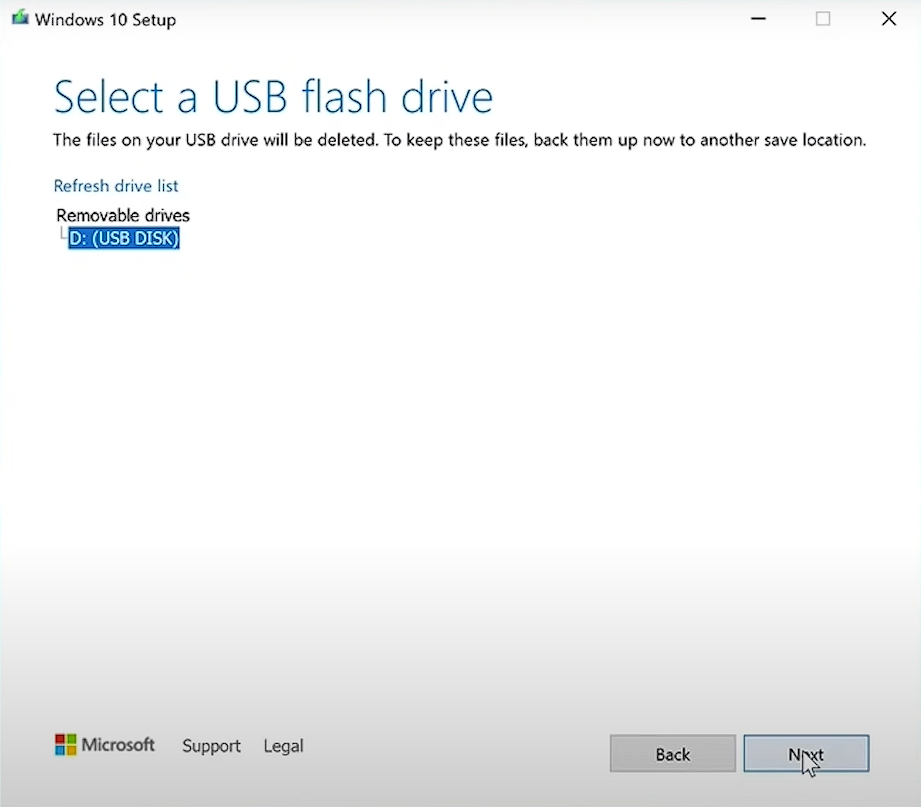
Select the USB you want to use, then press "Next." This step will erase all data on the selected USB Flash Drive. Ensure you back up any important data to an external drive or a file storage service.
-
Wait for the MCT to complete the process; this might take a while.

-
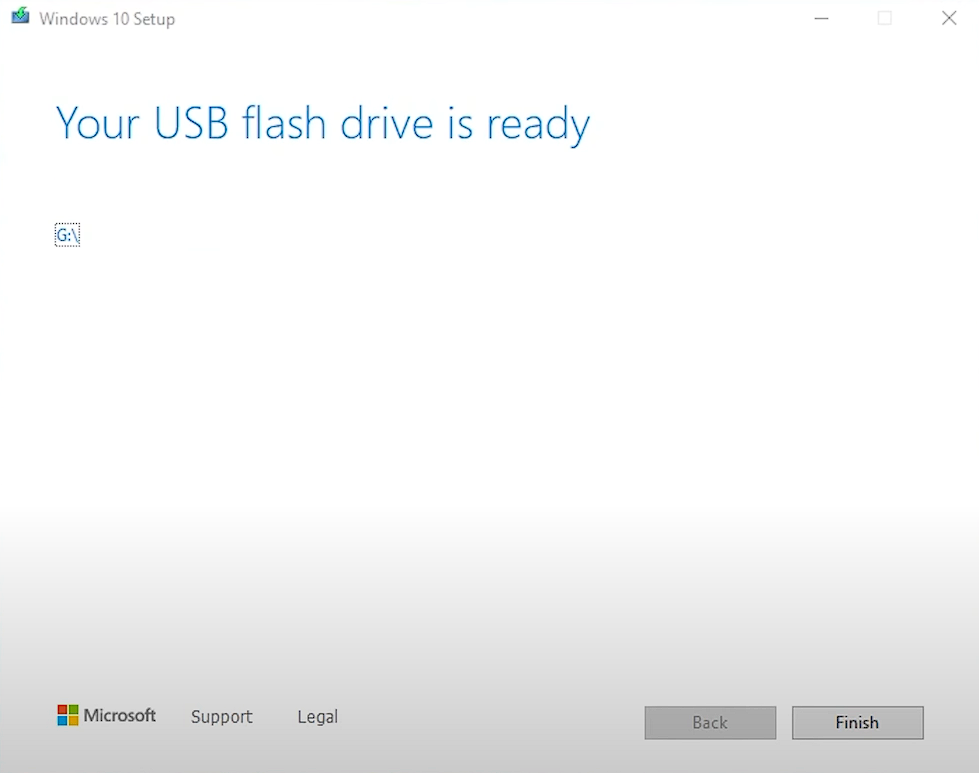
Once the process is complete, you will see the message "Your USB flash drive is ready." This indicates that Windows has been successfully copied to your USB drive and is now bootable. Press "Finish" to close the setup.
Various Installation Methods
Here are some alternative methods to install Windows:
How to Use MSDL for Downloading Windows ISOs
-
Access MSDL
To start, head over to the GraveSoft Archive (MSDL), where you can find a variety of Windows ISO images. -
Filter Quickly with Search Buttons
At the top of the page, you'll find buttons that allow you to easily filter for different Windows versions, including Windows 8.1, 10, and 11.

-
Browse the List of Available Versions
The available list shows each product along with its version number. Keep an eye on the build numbers - look for the most recent ones by checking the numbers after the decimal point. For example:- Windows 10 - Version:
19045(often referred to as22H2) - Windows 11 - Version:
22621(usually22H2) - Windows 11 - Version:
22631(usually23H2) - Windows 11 - Version:
26100(recommended, typically24H2)
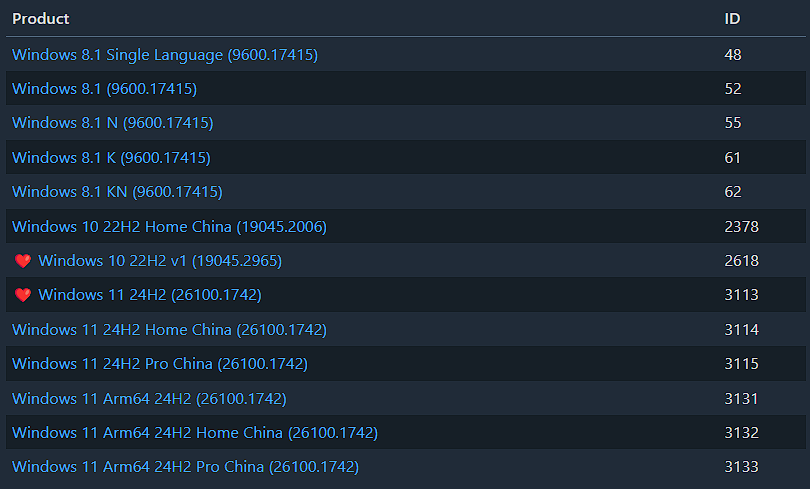
When choosing a build, look for those marked with ❤️. These are the recommended and stable versions. Avoid selecting Chinese editions, Windows Home and ARM64 builds, as they're not compatible with RapidOS.
- Windows 10 - Version:
-
Download the ISO
After selecting the desired version, you will be redirected to a page where you can choose your language. Once you've made your selection, a download link will appear. Please note, this link will be available for 24 hours only.
How to Use UPPDump to build ISOs
UPPDump Builds ISO on Your Computer
Before using this method, you need to understand that you are building an ISO on YOUR computer with installing the latest updates. While it usually works fine, there is a possibility that the process may be broken, and it will take a considerable amount of time.
-
Visit UPPDump
Go to uppdump.net, a website that allows you to download Windows updates and specific builds directly from Microsoft's servers. -
Choose a Version On the homepage, you'll see the following buttons:

Canary Versions: the most unstable builds.Dev Channel: unstable, but slightly more stable than Canary.- Windows 11: select for stable Windows 11 version.
Windows Server: select for Windows Server.- Windows 10: select for stable Windows 10 version.
All the options that are crossed out are not supported by RapidOS and are unnecessary for regular users.
If you click on Windows 10, Windows 11, or Windows Server, a drop-down list will appear showing specific versions available for selection. Select your preferred version and proceed to the next step of the installation process. The table below provides more details about the options:
Version Drop-Down Options Recommended Version Notes Windows 10 1809,21H2,22H2Windows 10 Pro - Version: 19045(22H2)1809and21H2are outdated and not recommended.Windows 11 21H2,22H2,23H2,24H2Windows 11 Pro - Version: 22631(23H2) or26100(Latest,24H2)21H2and22H2are outdated and not recommended.Windows Server 21H2,22H2,23H2,24H2Latest Windows Server is not officially supported by RapidOS. -
Choosing a Build
Once you've selected your version from the drop-down list, you need to choose a build from the available list of builds.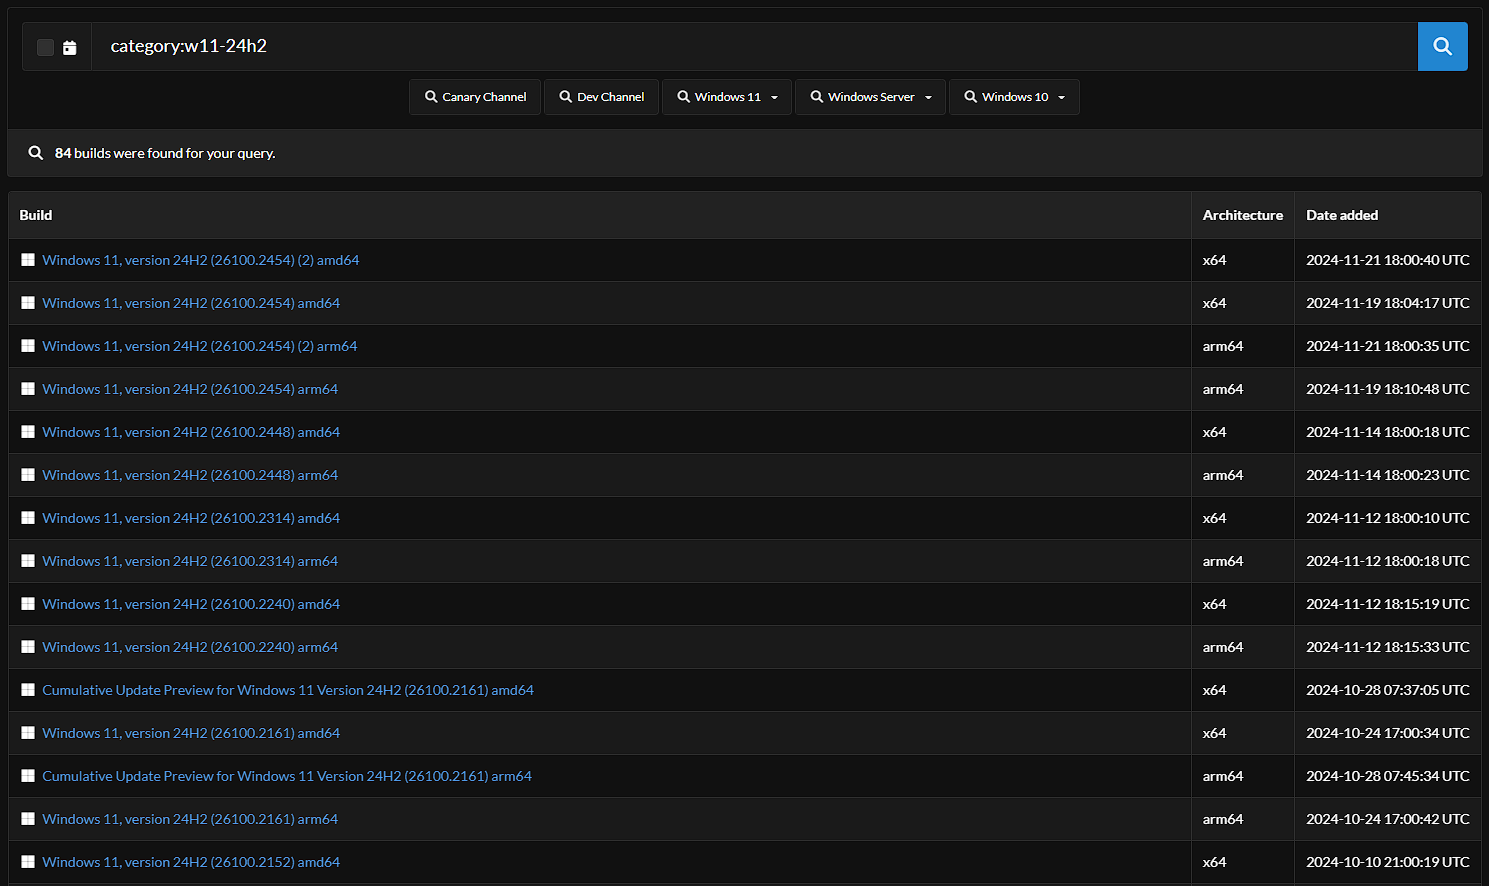
In the left column, you'll find the "Build" section. The names of the builds will look like this:
Windows 11, version 24H2 (26100.XXXX) amd64Where:
- Windows 11 (or Windows 10) refers to the operating system version.
- version 24H2 (or 23H2, etc.) indicates the specific update or release version.
- (26100.XXXX) is the build number.
- amd64 (or arm64) specifies the architecture type (AMD/Intel 64-bit or ARM 64-bit).
In the right column, you will see the "Date added" section. It's recommended to install the latest build. For example, choose:
Windows 11, version 24H2 (26100.XXXX) amd64
instead of this:
Cumulative Update Preview for Windows 11 Version 24H2 (26100.XXXX) amd64.Select your preferred build and proceed to the next step of the installation process.
-
Build Configuration
When you click on the button for the specific build you want to install, you'll be directed to the configuration page shown below
Page 1: Choose Language
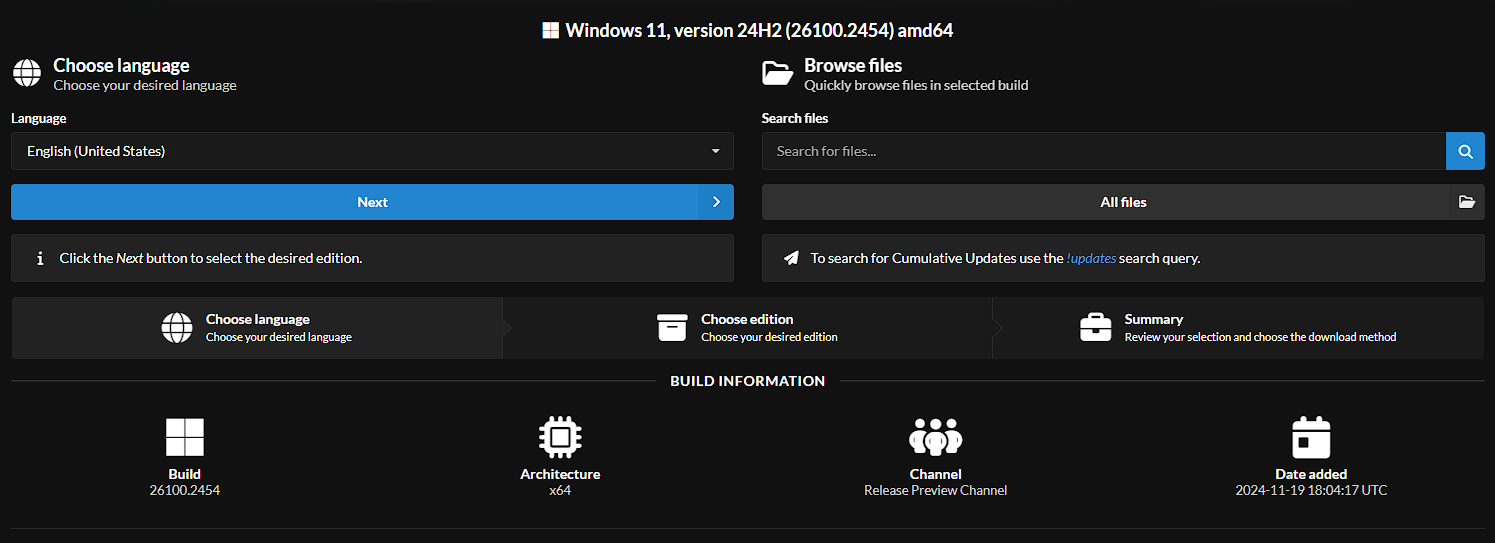
On this page, you need to select your preferred language and then click "Next".
Page 2: Choose Edition
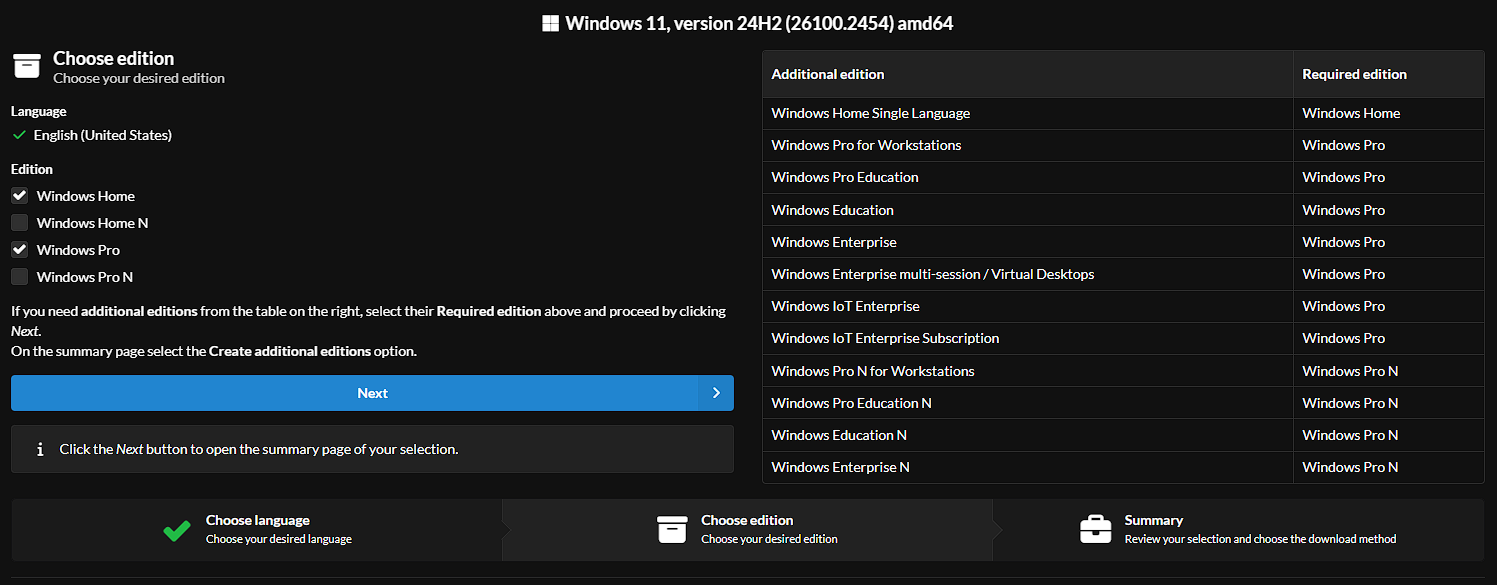
In this step, you will need to choose the edition you want to install. There, you need to deselect Windows Home (in case you are not using it), and press "Next".
Page 3: Summary
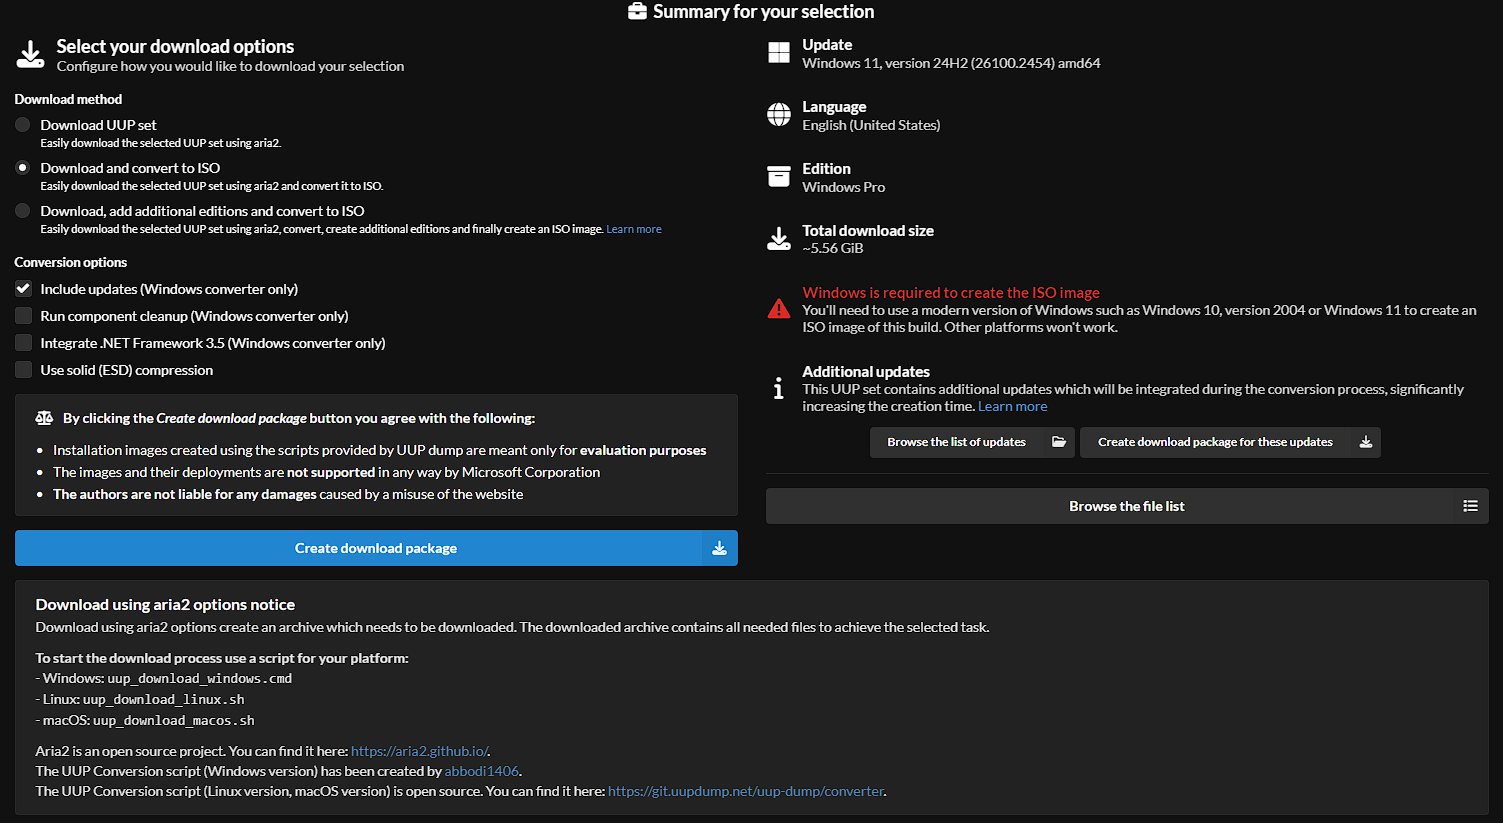
After selecting your desired language and edition, you will arrive at the Summary page, which presents an overview of the configuration and options for downloading and creating the ISO file.
-
Select Download and Convert to ISO for simplicity and efficiency.
-
Enable Include Updates for an updated ISO. If needed, also enable Integrate .NET Framework 3.5. Avoid using ESD Compression and Component Cleanup unless specifically required.
-
Click Create Download Package to download a ZIP archive containing all necessary scripts and files.
-
Extract the ZIP archive into a folder for convenience, such as
C:\uppdump. -
In the extracted folder, locate the platform-specific script for your device:
- Windows: Run
uup_download_windows.cmd. - Linux: Run
uup_download_linux.sh. - macOS: Run
uup_download_macos.sh.
- Windows: Run
-
Wait for Completion:
- Run the appropriate script based on your operating system. Wait until the process finishes.
- Upon successful completion, you'll see a green success message, and the ISO file will be available in the same folder where you unpacked the ZIP archive.
-
3. 🛠️ Create a Bootable USB
Important
This section is for those who used MSDL or UUPDump. MCT automatically formats and makes the USB drive bootable.
The entire USB drive will be formatted during the process. Ensure you back up any important data before proceeding.
Make sure that you have an USB flash drive that is at least 8GB or greater.
Rufus

- Download Rufus from its official website.
- Insert a USB drive.
- Select the Windows ISO file.
- Configure the partition scheme (MBR or GPT) based on your system.
- Click Start and wait for the process to finish.
Ventoy
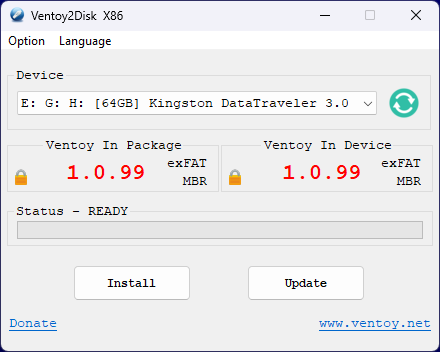
- Download the Ventoy ZIP archive from its official website.
- Extract the
ventoy-x.x.xx-windows.ziparchive to a folder of your choice. - Run
Ventoy2Disk.exe, go to "Option" click "Partition Style" and choose either MBR or GPT. - Select your USB drive and click the Install button to install Ventoy on it.
- Copy the Windows ISO file directly to the USB drive.
Tip
Try ReviOS ventoy settings to bypass Microsoft account requirements and disable automatic updates.
- Download the ReviOS ventoy configuration files using link above.
- Extract the zip file and copy everything to the root of your USB drive.
- Move the downloaded Windows ISO file to the WinISO folder.
The final directory structure should look like this:
After this, boot into the Windows installation and proceed with the default setup. The ReviOS settings will be applied automatically.4. 📥 General Windows Installation
Before Windows installation you should configure BIOS:
- Reboot your PC and access BIOS (common keys are
Del,F2,Esc, orF12). - Configure your USB drive as the first boot device. To do this, get into your system's BIOS and adjust the boot order to prioritize USB media (usually located under the boot tab). Alternatively, look for "boot menu" on the BIOS splash screen, press the indicated function key, and select the USB flash drive to boot.
- For Windows 11, ensure that Secure Boot and TPM 2.0 are enabled.
Ventoy users
If you encounter a "Security Violation" error, disable Secure Boot or enroll a key or hash.
After creating a bootable USB and configuring BIOS/UEFI settings, follow these steps to complete the Windows installation process:
Installing Windows 10/11
Tip
-
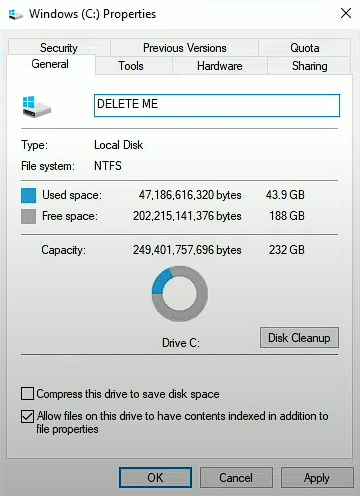
Rename the drive you plan to format (most likely
C:\) to "DELETE ME".
This makes it easier to identify the correct drive during the installation.
-
Alternatively, disconnect all storage disks except the main disk (
C:\) before installing Windows.
This prevents accidental formatting of other drives and ensures the installer selects the correct disk as the boot drive.
- Boot your computer from the USB drive containing the Windows 10 installation media.
- Follow the steps on screen to install Windows 10.
- There click "Install now".
.png)
- Proceed until you reach the license key screen. At this point, you can either enter your license key or select the "I don't have a product key" option if Windows has been previously installed on this computer.
.png)
-
Then you'll need to choose what version of Windows you want to install.
Windows Pro is generally the best choice, but this depends on user preferences.
Many Windows editions, such as Home and others, have significant feature limitations:Windows Home:
Lacks advanced features like Hyper-V, BitLocker encryption, WSL, and Remote Desktop hosting.
Windows Education:
Made towards academic use, includes most Pro features but may have restrictions on enterprise capabilities.
.png)
-
Continue to the "Which type of installation do you want?" screen and select "Custom: Install Windows only (advanced)".
.png)
-
Now comes a crucial step.
If you followed the tip earlier in this guide you might have renamed your drive to DELETE ME or disconnected other drives.
.png)
In my example, Drive 3 is named DELETE ME, so it needs to be deleted.
Additionally, delete all other partitions associated with Drive 3, as Windows creates extra partitions for system backups and other purposes.Important
Double-check that you are deleting the correct drive.
Any incorrect deletion can result in permanent data loss on other drives.
Do not delete drives or partitions that belong to other storage devices.Then, just click on your clean drive (for instance, Drive 3) and press Next.
Windows installation will begin..png)
Just wait till the end and proceed to the next step of the installation process.
- Boot your computer from the USB drive containing the Windows 11 installation media.
- Follow the steps on screen to install Windows 11.
- There, you should click "Install Windows 11" and check the checkbox to confirm that you agree everything will be deleted.
.png)
- Proceed until you reach the license key screen. At this point, you can either enter your license key or select the "I don't have a product key" option if Windows has been previously installed on this computer.
.png)
-
Then you'll need to choose what version of Windows you want to install.
Windows Pro is generally the best choice, but this depends on user preferences.
Many Windows editions, such as Home and others, have significant feature limitations:Windows Home:
Lacks advanced features like Hyper-V, BitLocker encryption, WSL, and Remote Desktop hosting.
Windows Education:
Made towards academic use, includes most Pro features but may have restrictions on enterprise capabilities.
.png)
-
Now comes a crucial step.
If you followed the tip earlier in this guide you might have renamed your drive to DELETE ME or disconnected other drives.
.png)
In my example, Drive 3 is named DELETE ME, so it needs to be deleted.
Additionally, delete all other partitions associated with Drive 3, as Windows creates extra partitions for system backups and other purposes.Sorry, I'm lazy and I don't want to start the Windows 11 24H2 setup just to show you "DELETE ME" in 24H2, so we'll use Windows 10 22H2 (the principle is the same, 24H2 just has a new design).
Important
Double-check that you are deleting the correct drive.
Any incorrect deletion can result in permanent data loss on other drives.
Do not delete drives or partitions that belong to other storage devices.Then, just click on your clean drive (for instance, Drive 3) and press Next.
Windows installation will begin..png)
Windows OOBE
Once the installation begins, you'll be guided through the Out-of-Box Experience (OOBE). To avoid forced online account setup, follow these steps:
Follow these steps during the setup process:
- When prompted to connect to the internet, click I don't have internet.
- On the next screen, select Continue with limited setup or Domain join.
- In the Privacy section, deny all options.
- Deny Cortana when prompted.
During the setup process, follow these steps:
- At the start of the setup, select your preferred language and keyboard layout.
- Press Shift+F10 to open the Command Prompt.
- Type
OOBE\BYPASSNROand press Enter. Your computer will restart.- Note: This step can be skipped if you are using Ventoy.
- After the restart, continue the setup, ensuring you:
- Do not connect to the internet.
- Deny all options in the Privacy section.
Driver Installation Options
It's recommended to manually install drivers for better control, stability, and compatibility:
Prevent Automatic Driver Installation
Before connecting to the internet, use the AtlasOS Disable Automatic Driver Installation tweak to stop Windows from automatically installing drivers.
Once applied, you can safely connect to the internet and install drivers manually.
Option 1: Manual Driver Installation
- Graphics Drivers: Use NVCleanstall for NVIDIA or visit the manufacturer's website (AMD, Intel).
- Motherboard and Chipset Drivers: Download directly from your motherboard manufacturer's support page.
- Optional: Use Snappy Driver Installer (SDI) for automatic driver installation.
Option 2: Allow Windows to Install Drivers Automatically
- Keep the system connected to the internet during or after installation.
- Windows will automatically download and install essential drivers once the desktop is reached.
For better understanding take a look at this table:
| Installation & Updates from Windows Update | Manual Installation & Updates |
|---|---|
| Easiest if you don't know how to get drivers | Potentially less system resource usage |
| Best compatibility, especially with OEM apps | Less potentially unwanted applications |
| Latest security & feature updates automatically | Full control over your driver versions |
| Almost never having to manually get drivers | You will likely need to get drivers for new devices |
This table taken from AtlasOS
5. 🚩 All done!
If you need any assistance, you can find links below to a large community of users ready to help, as well as additional documentation resources.
We hope you enjoy using RapidOS! 🤝